

Go back to Product Documents Navigation
Go back to Meowbit Documents Navigation
There are two Meowbit modes for MakeCode Arcade and MicroPython programming respectively. Now let's follow the steps below to change the mode.
01 Enter the MicroPython mode
Download the latest firmware
Download the firmware: 📎meowbit.uf2.zip
| If you have never used MicroPython mode before, please follow the steps below closely. |
Operation
Connect your Meowbit to the computer with a USB cable and follow the steps below.
| Please make sure your BootLoader firmware is the latest version V2.8.2. If your firmware is older than this version, please upgrade this based firmware to the latest first. |

When you finish this step, you can see the ARCADE-F4 drive letter appear, then continue to the next step.
Decompress the the meowbit.zip (mentioned above) and then we get the meowbit.uf2, which is the firmware. Drag the .uf2 file to the ARCADE-F4 drive letter, and then wait for it to finish. (Then we finish the burning process!)

Use a text editor (we recommend VS Code here) to open the main.py file in the PYBFLASH and copy the code (python) below to the main.py file of Meowbit. Then save it and press the RESET button on Meowbit to reset.
|
from meowbit import * screen.text('hello world') |
Now you can see "hello world" showing on the screen!
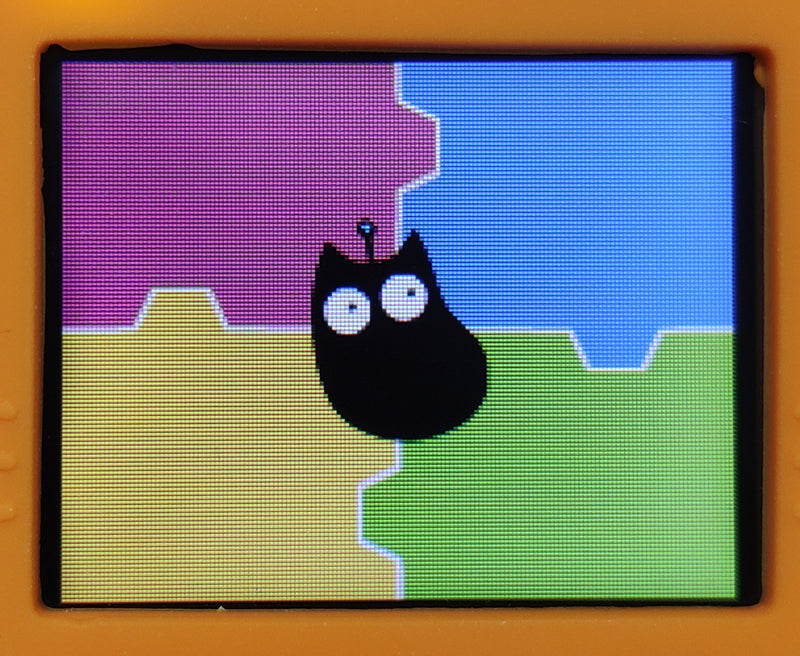
| When there is nothing related to the screen in the code, the screen will keep the way it is now (a black kitty in the middle and four puzzles at the back). |
02 MicroPython API
Import meowbit library
Only when we imported the meowbit library can we use all the API of Meowbit~
|
from meowbit import * screen.text('hello world') |
Button
There are 6 programmable buttons on Meowbit.
sensor.btnValue(btn)
Return the boolean value of whether the button is pressed. Parameter:
- btn: 'a', 'b', 'up', 'down', 'left', 'right' represent 6 buttons respectively.
sensor.btnTrig[btn] = fn
This is the interrupt of the button, which binds an executing function to the button. Parameter:
- fn: the function that will be executed when interrupt.
Don'ts in this function:
|
Sample Program A📋: Button A to control LED1 to be on or off
|
from meowbit import * while 1: if(sensor.btnValue('a')): led1.on() else: led1.off() |
Sample Program B📋: The interrupt of button A to control LED1 to be on or off
|
from meowbit import * import time def fn(): led1.toggle() time.sleep_ms(500) # eliminate the mechanical dither sensor.btnTrig['a'] = fn sensor.startSchedule() # No matter how many interrupt threads you have, you only need execute this line once |
LED
There are two LEDs on the upper corner of Meowbit, which are green LED1 and red LED2.
led1.on() / led1.off()
Control to be on or off.
led1.toggle()
toggle from different statuses.
led1.intensity(brightness)
Change the brightness of the LED.
- brightness: 0~255 (from dark to bright. 255 by default, 50 recommended)
Sample Program A📋: Turn on or off - the green LED flickers 5 times when turning on
|
from meowbit import * |
Sample Program B📋: Status toggle - the red LED flickers 5 times when turning on
|
from meowbit import * |
Sample Program C📋: Status toggle - from dark to bright to off
|
from meowbit import * |
Buzzer
The passive buzzer uses a timer to simulate PWM to sound.
buzzer.tone(freq, d = 0.5)
- freq: the frequency that corresponds to the key (tone)
- d: Duration (in seconds), the default is 0.5s, when d=-1, it is set to sound continuously
buzzer.note(note, rest = 0.5)
- note: There are 12 octaves in total from 0 to 130, the multiples that are divisible by 12 are in the key of C.
- beats: the number of beats lasting (in seconds), default is 0.5s.
buzzer.rest(rest)
Mute for a period of time.
- rest: lasting time (in seconds)
buzzer.melody(m, bpm = 120)
Play a melody.
- bpm: The tempo, the default is 120, which is 120 beats per minute.
- m: m=octave:duration=note + octave [default is 4]: the number times of the ticking sound [default is 4], it is specified that duration = 4 is a quarter note, and the duration of the ticking sound is determined by BPM, which can be any duration.
- When the bpm is by default, c4:4 is to sound for 1 beat (0.5s).
- When the bpm is by default, the duration of the c4:8 is twice as much as the c4:4.
- When bpm changes to 60, the duration of c4:4 changes to 1 second.
- The following simple sound effects are retained in the firmware.
|
Name |
Content |
|
CORRECT |
"c6:1 f6:2" |
|
NOTICE |
"d5:1 b4:1" |
|
ERROR |
"a3:2 r a3:2" |
buzzer.stop()
The buzzer stops playing. Can be placed in the button interrupt to stop the melody from playing; can also be combined with melody playing to create the effect that it sounds when the button is pressed, and mute when the button is released.
Sample Program A📋: Show all the buzzer function effects, button A to stop the melody from playing
|
from meowbit import * |
Sample Program B📋: The buzzer sounds when button A is pressed, it mutes when the button is released
|
from meowbit import * |
Temperature
sensor.getTemp()
Get the temperture value (in Celcius).
Sample Program 📋:
|
screen.sync = 0 # 0 is to turn off sync and the default is 1 (on) |
Light Sensor
sensor.getLight()
The light sensor detects the brightness level of the environment. The return value is analog value 0~4096, and the brighter the environment the larger the value.
Sample Program 📋:
|
from meowbit import *
|
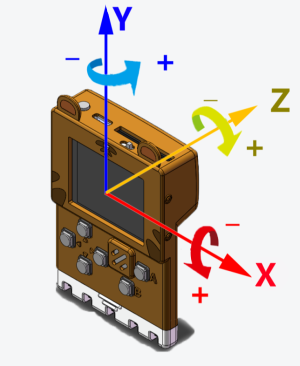
Gyroscope
sensor.accX()
sensor.accY()
sensor.accZ()
Return the acceleration value of the axes with the unit g (m/s2).
sensor.gyroX()
sensor.gyroY()
sensor.gyroZ()
Return the axial acceleration value of the axes with the unit g (angle/s2).
|
The arrows point at the positive direction of the corresponding axial speed (the screen facing direction)
|
sensor.roll()
Return the roll angle as in the figure below.

sensor.pitch()
Return the pitch angle as in the figure below.

sensor.gesture(ges)
The gesture. Return the boolean value. Parameter:
- ges: shake. freefall, tilt_up, tilt_down, tilt_left, tilt_right, face_up, face_down
|
The reference is the Meowbit screen. |
sensor.gesTrig[ges] = fn
The gesture interrupt event. When the set gesture is reached, the custom interrupt function will be executed. Parameter:
- ges: shake. freefall, tilt_up, tilt_down, tilt_left, tilt_right, face_up, face_down
|
Note that we use [] to wrap the parameter. |
- fn: custom function
|
Note when defining this custom function:
|
Sample Program 📋: Test all the related return value and print them on the screen
|
from meowbit import * |
Display
screen.refresh()
Refresh the screen to show. Should be used when the sync refresh mode is off.
screen.sync = val
Set the sync refresh. Parameter:
- val: 1 to be on, 0 to be off. The default is on.
screen.fill(color)
Fill the screen. Can be RGB or Brightness. Parameter:
- color:
- (R,G,B): 0~255
- brightness: 0~255, screen.fill(0) is used to clear the screen.
|
Coordinates (x,y) correspond to the screen size 160 * 128 as the figure below 👀.
|

|
🔎 The following parameters can be used in changing all the colors:
|
screen.pixel(x, y, color=255)
Draw pixel. Parameter:
- color: R, G, and B stand for red, green, and blue respectively. The range is 0~255, which is the standard RGB color value. If left blank, the default is color white, and the brightness value is 255.
screen.line(x1, y1, x2, y2, color=255)
Draw lines or line segments with (x1, y1) and (x2, y2) as vertexes.
screen.line(x1, y1, x2, y2, color=255)
🟥 Use (x, y) as the top-left vertex of the rectangle to draw a rectangle with width and height. Parameter:
- Fill: parameter
- 0: do not fill
- 1: fill
- 0 (not fill) is by default
screen.triangle(x1, y1, x2, y2, x3, y3, color=255, fill=0)
🔺 Draw a triangle with (x1, y1), (x2, y2), and (x3, y3) as vertexes.
screen.circle(x, y, r, color=(R, G, B), fill=0)
🔴 Draw a circle with radius r with (x, y) as the center.
screen.polygon(x, y, sides=3, r=10, th=3, rot=0, color=255, fill=0)
🔷 Take (x, y) as the center point and draw a polygon.
- Sides: the default number of sides is 3
- r: the default distance from the center point to the vertex is 10
- th: the default thickness of the side is 3
- rot: the default rotate angle is 0 (if it's positive, then rotate counterclockwise)
screen.text(text, x=0, y=0, ext=1, color=255)
Show non-Chinese characters (like numbers and letters) on the screen. Parameter:
- The coordinates are in the upper left corner of the first character, the default is (0, 0) if it is not set.
- ext: The default English character font size is size 1, which is 8*8 pixels. The font size increases with the increase of ext, font size=8*ext.
screen.textCh(text, x=0, y=0, ext=1, color=255)
Show Chinese characters (including English letters and numbers, but using screen.text() will have a better effect if showing non-Chinese strings). Parameter:
- The coordinates are in the upper left corner of the first character, the default is (0, 0) if it is not set
- The default Chinese character font size is size 1, which is 12*12 pixels. The font size increases with the increase of ext, font size=12*ext.
screen.loadBmp(path, x=0, y=0)
Display BMP picture. Only supports 24-bit or 32-bit BMP. Parameter:
- path: path='name.bmp'
- coordinates: the default is (0, 0) (the upper left corner of the image) if not set.
screen.loadgif(path, x = 0, y = 0)
Display GIF image. We recommend you use an SD card to show it, because the Meowbit Flash only has 2M.
|
📥 Test Image 📎bmp_test.zip
|
# bmp Show bmp from meowbit import * |
Pin
p1 = MeowPin(pin, mode)
Instantiate a pin and set a certain mode for a certain pin. Parameter:
- pin: string type like 'P1'
- mode:
- IN: digital input, it is pulled up by default
- OUT: digital output
- ANALOG: analog input
- PWM: analog output
getDigital()
It can be used when it is set to the digital input mode (mode = IN). Return 0 as low level and 1 as high level.
getAnalog()
It can be used when it is set to the analog input mode (mode = ANALOG). Return 0~4095 due to 12-bit ADC.
setDigital(val)
It can be used when it is set to the digital output mode (mode = OUT). Output pin high and low level 0V / 3.3V. Parameter:
- val:
- 0: Voltage 0V
- 1: Voltage 3.3V
setAnalog(val)
It can be used when it is set to the analog output mode (mode = PWM). Output 0~1023, and decompose 0~3.3V into 1024 ranges of voltage. Parameter:
- val:
- 0: Voltage 0V
- 1: Voltage 3.3V (ground)
set_pulse_width(duty)
It can be used when it is set to the analog output mode (mode = PWM). Output the PWM duty cycle. It normally is used for controlling servos. The duty cycle in a cycle is calculated to control the angle accurately. Parameter:
- duty: For example, the duty cycle of a 9g servo with a 500~2500us pulse and range 0°~180° is 2.5%~12.5% in the default cycle of Meowbit (20ms).
irq(trigger=ExtInt.IRQ_FALLING, handler=None, pull=Pin.PULL_UP)
The external interrupt of the pin. We can set an interrupt function to execute when the conditions are reached. Parameter:
- trigger:
- ExtInt.IRQ_FALLING Trigger falling edge (default)
- ExtInt.IRQ_RISING Trigger rising edge
- ExtInt.IRQ_RISING_FALLING Trigger both falling edge and rising edge
- handler: A custom function that will execute after the interrupt
- pull:
- Pin.PULL_UP Turn on the pullup of the pin (default)
- PULL_DOWN Turn off the pulldown of the pin
- PULL_NONE Turn off pullup and pulldown (not so often used)
SD Card
The SD card can only be used under the MicroPython mode.
Under this mode, Meowbit would self-check whether there is an SD card after connecting to a USB cable. If there is no SD card inside, the file system will be set to the internal Flash; if an SD card is detected, then the system will be set to that SD card, and the PUBFLASH drive letter would change to the SD card drive letter.
1. How to choose an SD card
- Since the SPI bus speed rate is high, so we need a high-speed SD card. (But not all high-speed SD cards are suitable. Normally it requires a c10 SD card with over 4G memory. We recommend two SD cards: OV C10 16g and the Micro SD card)
- Both the SD card and the Micro Sd card can be used with Meowbit. However, if it is a Micro SD card, an adapter should be used to insert the card.
2. Please insert the SD card in Meowbit before powering Meowbit (Please do not hot-plug it)

3. First we need to be sure that if there's no special setting, Meowbit would run the main.py file once being powered. Thus we only need to put a mian.py program in the SD card. (When the SD card is not detected, the PYBFLASH drive letter of Meowbit is the internal Flash with only 2M storage. When an SD card is inserted and detected, the storage becomes larger.)
☆ Try to test Meowbit with the following steps:
a. First create a main.py file in the drive letter (Note that .py is the filename extension)
b. Use a text editor (VS Code recommended) to open main.py and then write a program to show a line of welcoming strings on the screen and save the program.
|
from meowbit import * |
c. After you save the program, press the RESET button on the right side of Meowbit to reset Meowbit and re-test the file system, so that the new program can run.
d. Now let's see the result.
File System Operation
MicroPython supports standard Python file modules. For example, we can use built-in functions like open().
☆ Basic file operation
a. Create a file
Copy the following code to the main.py file and then save it. Note that we need to reset it twice. The first time is to run the main.py, and the result is to create a txt file named "myFile" and enter the content "hello world!" But Meowbit only detects the change of the file system at the beginning of resetting (no matter it is soft reset or hard reset), so any changes after that can only be detected the next time we reset Meowbit, that's why we need to reset Meowbit for the second time to check whether the file is created successfully.
|
""" |
If everything goes well, we can see the result like the figure below.
b. View the file content
Copy the code below and replace the content in main.py. Save the file and reset Meowbit.
|
from meowbit import * |
We can see that the strings shown on the screen is the same as that in the myFile.txt file.
c. Advanced file / directory process module: os
Basic directory operation API.
|
import os |
If you have any question, please feel free to contact us at Discord, we will always be there to help.
KittenBot Team
Go back to Product Documents Navigation
Go back to Meowbit Documents Navigation